安装环境: centos7 64位 MINI版,当前Redis最新版本为3.2,所以本文以3.2为例担建Redis集群。
1、Redis服务器说明
用2台虚拟机(192.168.0.201和192.168.0.202),各安装3个Redis实例。分别为3个master和3个slave,模拟6台机器担建一个Redis集群。
192.168.0.201:6379
192.168.0.201:6380
192.168.0.201:6381
192.168.0.202:6382
192.168.0.202:6383
192.168.0.202:6384
2、安装Redis集群节点实例
编译Redis源码前先检查系统是否安装了gcc,没安装的话执行yum install -y gcc安装。
1> 安装Redis
shell> wget http://download.redis.io/releases/redis-3.2.0.tar.gz
shell> tar -zxvf redis-3.2.0.tar.gz
shell> cd redis-3.2.0
shell> make && make install
shell> ln -s /usr/local/bin/redis* /usr/bin/
shell> cp src/redis-trib.rb /usr/bin/
2创建节点
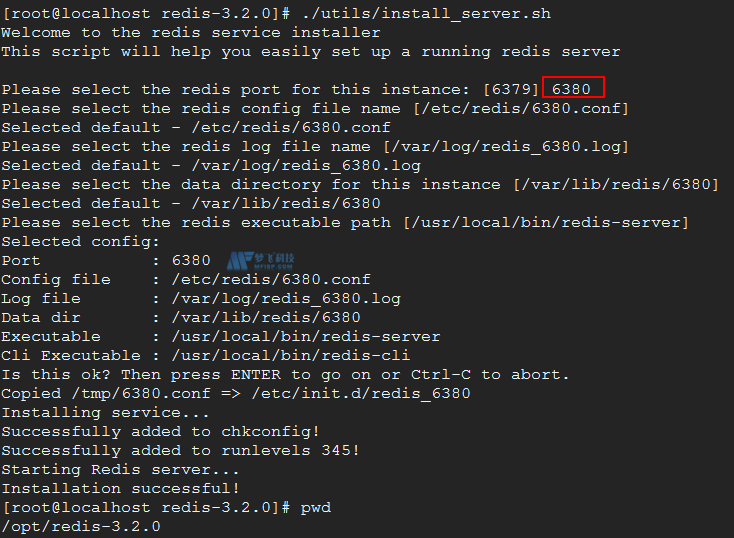
shell> ./utils/install_server.sh

在两台虚拟机上依次执行install_server.sh脚本分别各安装3个redis实例。在安装提示时输入上面约定的端口(如:6380),改变端口后同时配置文件、日志文件和数据存储目录名会自动加上端口号,以和其它实例区别。如果对安装路径没有特殊要求的话,在安装时只需改变端口号,其它都保持默认即可。默认配置文件如下:
配置文件:/etc/redis/port.conf
日志文件:/etc/log/redis_port.log
数据存储目录(aof文件、rdb文件、集群节点配置文件):/var/lib/redis/port
注意:port为你设置的端口
make时如果遇到zmalloc.h:50:31: error: jemalloc/jemalloc.h: No such file or directory错误,用make MALLOC=libc && make install重新安装。
Redis服务安装完成之后,服务会同时启动,且会自动加入到系统服务中,并设为开机启动。
3> 修改Redis实例的集群配置
修改绑定IP
Redis默认绑定的是127.0.0.0地址,需要将其修改为本机IP或0.0.0.0,集群中的各个节点才能互相通信。
# 192.168.0.201节点
shell> sed -i 's/127.0.0.1/0.0.0.0/g' /etc/redis/6379.conf
shell> sed -i 's/127.0.0.1/0.0.0.0/g' /etc/redis/6380.conf
shell> sed -i 's/127.0.0.1/0.0.0.0/g' /etc/redis/6381.conf
# 192.168.0.202节点
shell> sed -i 's/127.0.0.1/0.0.0.0/g' /etc/redis/16379.conf
shell> sed -i 's/127.0.0.1/0.0.0.0/g' /etc/redis/16380.conf
shell> sed -i 's/127.0.0.1/0.0.0.0/g' /etc/redis/16381.conf
修改端口号
安装完redis服务后,配置文件中集群的相关端口配置默认为6379,需要将其它几个非6379的端口修改过来。
# 192.168.0.201节点
shell> sed -i 's/6379/6380/g' /etc/redis/6380.conf
shell> sed -i 's/6379/6381/g' /etc/redis/6381.conf
# 192.168.0.202节点
shell> sed -i 's/6379/16379/g' /etc/redis/16379.conf
shell> sed -i 's/6379/16380/g' /etc/redis/16380.conf
shell> sed -i 's/6379/16381/g' /etc/redis/16381.conf
检查修改结果:
shell> cat /etc/redis/6380.conf | awk '{if($0 !~ /^$/ && $0 !~ /#/) {print $0' | grep 6380
port 6380
pidfile /var/run/redis_6380.pid
logfile /var/log/redis_6380.log
dir /var/lib/redis/6380
cluster-config-file nodes-6380.conf
有5处修改端口的地方,修改成功!
修改集群配置
cluster-enabled yes
cluster-config-file nodes-6379.conf
cluster-node-timeout 5000
appendonly yes
cluster-enabled:开启集群模式
cluster-config-file:保存节点的配置信息,如集群中所有节点的IP、端口、状态、节点类型(master/slave)、节点ID、slots等
cluster-node-timeout:节点心跳超时时长
appendonly:开启aof文件存储
依次将每个实例配置文件中的以上注释打开,并修改成对应的值。
重新启动所有redis服务:
shell> service redis_portN restart

但它们现在都还是独立的实例,还没有分配到一个集群当中。没有master和slave关系。
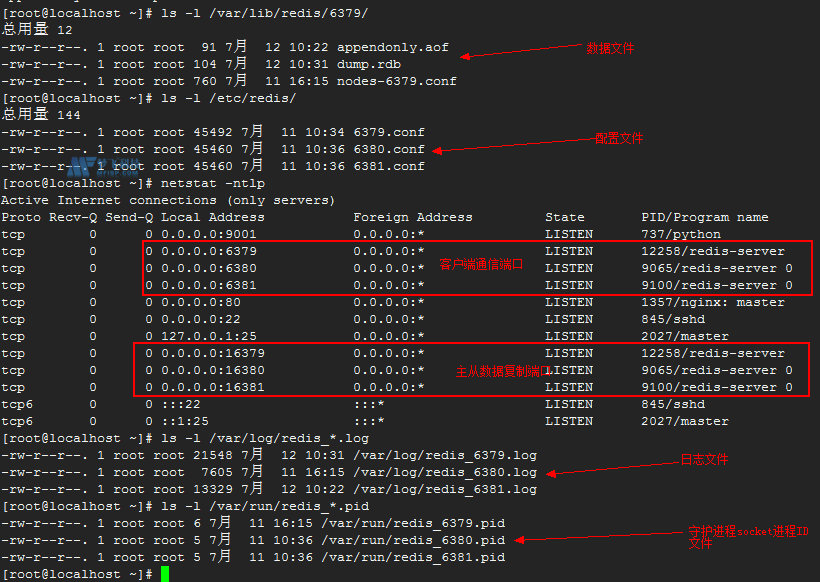
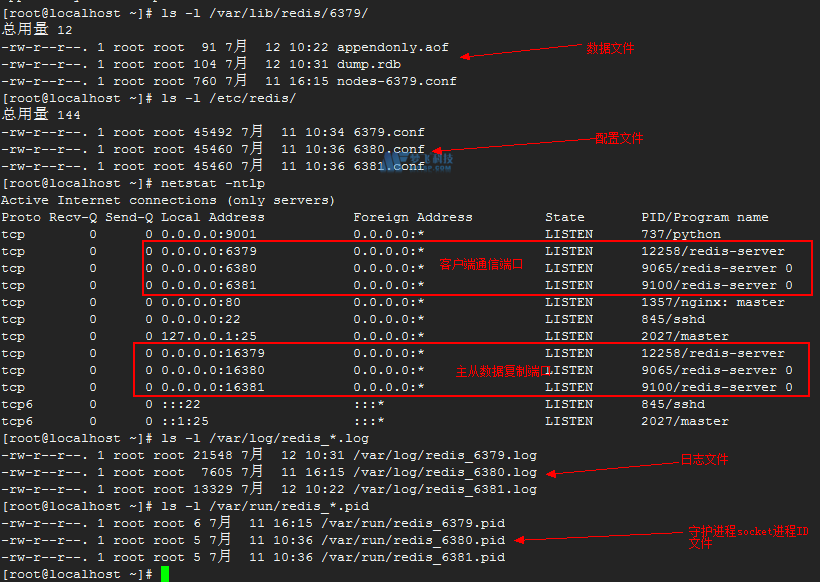
查看服务详情及配置文件信息:

此时通过PS命令查看redis进程,和普通进程不同的是在进程名后边加了一个[cluster]标识。192.168.0.201节点如下图所示:


